Upgrade HDD to SSD
Why Need to Upgrade HDD or Move Windows to SSD
Compared with HDD, SSD enjoys lots of outstanding features. For example, SSDs have access speeds of 35 to 100 micro-seconds, which is nearly 100 times faster than those of HDD. Therefore, more and more people lean to upgrading their HDD to SSD or moving Windows 7/8/8.1/10 to SSD only.
Well then, how can we fast complete hard disk upgrade or Windows migration? In this post, we will give a step-by-step tutorial.
Follow Our Tutorials to Migrate Windows or Upgrade HDD to SSD
Tip: since desktops and laptops require some different operations, we are going to introduce them separately.
Move Windows 7/8/8.1/10 to SSD on Desktops
It is believed that most desktop users are likely to migrate Windows to SSD rather than replace HDD with SSD, since desktops allow users to insert more than one hard disk. For these folks, please do the following steps.
Top Recommendation
Clean Install, Clone Hard Disk, Migrate Windows, Which Is Better
This post shows exact features of clean install, disk clone, and system migration, which can help you choose the most proper way to create new Windows.
Step 1. Mount both HDD and SSD to motherboard of your desktop, which means SATA connection rather than USB.
Step 2. Boot your computer. Please boot the Windows you want to migrate if you are dual or multi booting, because Partition Wizard just migrates the one which is loaded. However, if you want to transfer all systems to SSD, we suggest cloning HDD.
Step 3: Download and install MiniTool Partition Wizard Free Edition to your computer.
There are 3 big reasons for recommending this program:
Firstly, it works as long as the target disk has enough space to hold contents of the source disk. For instance, you are able to clone a 500GB HDD to a 250GB SSD as long as contents saved on HDD are not larger than 250GB.
Secondly, the time spent on cloning hard disk depends on how many files source disk saves rather than capacity of the source hard disk. For example, if a 500GB source disk saves 100GB data, MiniTool Partition Wizard only clones sectors the 100GB data reside, which saves much time compared with using hard drive duplicator.
Thirdly, it’s a free program if you are running it in Windows XP, Windows 7, Windows 8, Windows 10, or any other non-server Windows OS.
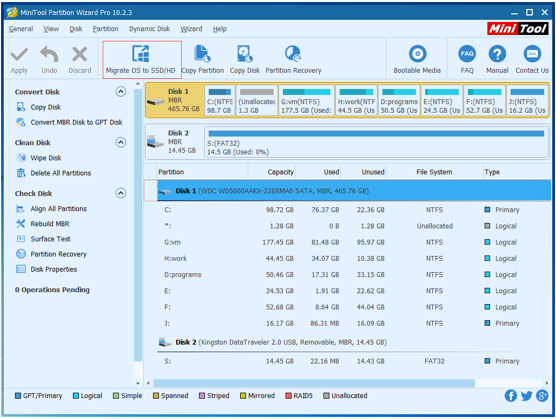
Step 4: Start and launch MiniTool Partition Wizard to get the window below:

Then, you can follow our help tutorial Migrate OS to SSD/HD to get detailed instructions.
Note: if you are running Windows in Legacy BIOS + MBR boot mode, remember to set computer to boot from SSD in BIOS.
However, some of you might plan to transfer all things from HDD to SSD instead of migrating system only. For these people, they only need to clone HDD to SSD. Please refer to the help tutorial post Copy Disk to get detailed steps.
Upgrade Laptop’s HDD to SSD
Tip: to employ this method, you’d better prepare a desktop. Of course, you can also do it on laptop if there is no desktop available, but system on SSD might be unbootable. Luckily, you can get solutions from our previous post Laptop Failed to Migrate OS from HDD to SSD, Try This Way.
Laptop users are more likely to upgrade HDD to SSD rather than migrate Windows since most laptops only provide one SATA interface. Of course, there is an exception.
Further Reading: a small part of laptops have both SATA and mSATA interface. On these laptops, users can choose to migrate Windows only. Please check your laptop to see whether there is such an interface.

In addition, even if there is mSATA interface on your laptop, the SSD you purchased should be compatible with it.
What we need: a laptop configured with HDD, an SSD, and a high-quality small-head Phillips screwdriver.

Prep work: transfer the computer to a clear, flat, stable work surface over a non-carpeted floor. Make sure the laptop is unplugged and the battery has been removed. Actually, we’d better press on the power button of laptop for several seconds to remove any residual charge.
Suggestions: create a backup for current system in case of any accident. If you are not very clear of each part of laptop, video the disassembly procedure or take photos showing where the screws and parts belong at each major step, since it is useful when you are reassembling your laptop.
Now, let’s start upgrading.
Step 1: Remove Hard Drive from Laptop
Firstly, we need to locate the compartment for hard drive. Most laptops’ hard disk is located under a removable panel, like these:

For this kind of laptops, it’s very easy to take hard drive out: use screwdriver to remove screws that fasten the removable panel, take the panel away, remove the screws that secure the hard drive to laptop, slightly detach any retaining clips and cables, and take the hard drive out. If there is a frame or carrier to fix hard disk, remove it and take out the real hard disk.
Trick:
Take care of any screws, frames, rubber grommets, etc., because you will reuse them to mount SSD.
![]() CAUTION:
CAUTION:
Don’t try to force things apart, because there might be hidden fasteners, screws, or cables. If you have to exert more force to remove or separate parts, stop immediately and then check whether there is such a tiny thing to block the disassembling, for any force could damage your computer.
Nevertheless, some of you might be unable to find the hard disk even after removing all removable panels from the bottom of the laptop. That is because some designers hide hard disk under keyboard or motherboard. In this case, the disassembly procedure seems much more difficult and should go like this:
-
- Remove the screws that hold the keyboard deck , detach any snaps that connect the lower portion of the case and keyboard deck, and then remove the keyboard deck. During this step, a card or spudger might be needed to detach things.

- Remove the screws that hold the keyboard deck , detach any snaps that connect the lower portion of the case and keyboard deck, and then remove the keyboard deck. During this step, a card or spudger might be needed to detach things.
-
- Remove the keyboard and other parts that hide the hard disk or prevent you from taking away motherboard, after taking out screws and detaching cables.
-
- Take the motherboard away if the hard disk is located under motherboard.
-
- Remove screws, cables, and any other things that fasten hard disk to laptop, and take out the hard disk.
- Remove the frame mounted on hard disk.
After seeing the introduction above, some of you might think it’s difficult and dangerous to remove hard drive from laptop, right?. If yes, don’t try disassembling blindly, because you may ruin your computer. And the best choice is to ask professionals for help, or turn to your laptop manufacturers. On the contrary, if you have confidence to do this, just do it by following our steps or other tutorials on the internet, but keep in mind: DON’T FORCE THINGS.
Once the hard disk is taken out, we can go to the second step.
Step 2: Clone HDD to SSD
 Firstly, you can choose to clone HDD to SSD with hard drive duplicator if you have such a device. But disappointingly, this kind of devices always require capacity of target hard disk should be no less than that of source disk. For example, to clone a 500GB HDD, we should prepare a 500GB or larger SSD. If not, the hard drive duplicator will refuse to work. In addition, as to how much time the clone will cost, for most drive duplicators, it depends on capacity of the source hard disk rather than file size, largely because every sector will be cloned. Therefore, when planning to copy large disk to small disk or clone disk not saving much data, you’d better make use of third party cloning program.
In addition, if you do not have a hard drive duplicator or hard drive duplicator refuses to work, you can also try using third party programs. And MiniTool Partition Wizard Free Edition could help you do it, too.
Once the hard disk is taken out from laptop, please follow steps below to do disk clone.
1. Connect both HDD and SSD to a desktop via SATA. Tip: connecting via USB might cause system on SSD unbootable.
2. Download and install MiniTool Partition Wizard to primary disk of the desktop but not disk originally belonging to laptop. If you have MiniTool already, just skip this step.
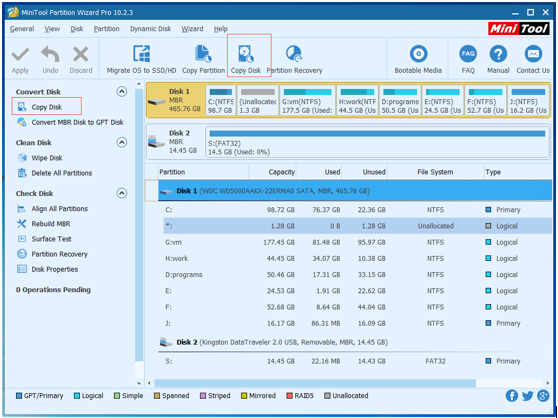
3. Start and launch the program to get the main window shown below.
4. Select the source disk and choose “Copy Disk” function.

5. Select the target disk (SSD) to clone HDD to and click “Next“. Note: Partition Wizard will remove all data saved on SSD , so please backup important ones.
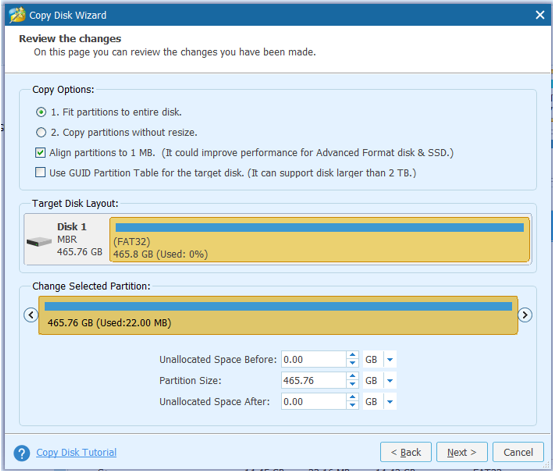
6. Choose one copying method from three and click “Next“. If SSD is big enough to hold partitions (not files) of HDD, you can choose “copy partitions without resize“. But if you want to edit partition size, increase or decrease, choose “Edit partitions on this disk“. In addition, we can see the option “Force to align partitions to 1MB” which is checked by default. Please keep this option checked, because it can largely increase performance of SSD. As to partition alignment, we will explain it in the last part.

7. Carefully read a popup boot note and click “Finish” button to go back to the main window of Partition Wizard.
8. Click “Apply” button to make all changes finally performed.
Once the source HDD is cloned to SSD successfully, we can dismount SSD from desktop and insert it to laptop.
Step 3: Hook SSD to Laptop
In this step, you just need to reverse the procedure to insert the SSD and reassemble the laptop. If you have videoed the whole process of disassembly or have taken pictures showing where the screws and parts belong at each major step , just reverse the process by following the video or photos. But if there is no video nor photos, you should have good memory to remember how hard disk, keyboard, or motherboard is connected. Of course, you can also turn to professionals and your laptop manufacturer.
After mounting SSD to laptop, most of you might think everything is done, right? But actually, there are many things to do, which could help you get most from SSD.
3 Tips on Getting Best Performance from SSD
Since SSD is much different from HDD, we need to do a lot of extra things.
Firstly, you’d better align all partitions on your SSD, because running Windows on misaligned SSD will largely reduce system running speed, data read/write speed, and other speeds. If you use MiniTool Partition Wizard to clone hard disk to SSD, there is no need to align partitions, because the program will do this automatically during the cloning process, which is due to the “Force to align partitions to 1MB” feature. But if you are using hard drive duplicator or other drive clone software to clone HDD, it’s very necessary to do the alignment since cloned partitions are always misaligned. In addition, you’d better align partitions of SSD periodically as operations like extend, shrink, and move may make partitions misaligned, too. For detailed steps to align partitions, please see our help tutorial Align All Partitions.
Secondly, you need to enable Trim, which is a command that allows an operating system to inform a solid-state drive which blocks of data are no longer considered in use and can be wiped internally. With Trim enabled, future writing speed would be increased.
TRIM Support Requirements:
1.Windows 7 and later operating systems
2.SSD with Trim enabled firmware
3.BIOD/UEFI storage controller set to AHCI/SATA mode
To check whether Trim is enabled or not, please run Command Prompt as an administrator and type:
fsutil behavior query DisableDeleteNotify
Then, you’ll get one of the following two results:
DisableDeleteNotify = 1
TRIM support disabled
DisableDeleteNotify = 0
TRIM support enabled
If Trim is disabled on your computer, just type:
fsutil behavior set disabledeletenotify 0
in Command Prompt.
For more features of Trim, please see Enable and Disable Trim for SSD.
Thirdly, keep some space free. An SSD would slow down if we fill it up. That is because the drive will have a lot of partially filled blocks, which are slower to write to than empty blocks. An investigation shows you should leave a minimum of 25 percent of the drive’s capacity free for the best performance. Windows build-in Disk Cleanup utility and third party clearing programs like CCleaner can help you get some free space.
For more tricks on optimizing SSD, please see our previous post How to Get Best Performance from SSD.
Related Articles:
- Cannot Access a Partition in Windows
- Backup Computer to External Hard Drive
- Reimage Computer
- Hard Drive Recovery
- Protect Yourself from Ransomware
- Best Windows 10 Backup Software
- Extend boot partition Server 2008
- Shrink partition in Windows 2003
- Low disk space in Windows SBS 2003
- Convert dynamic disk to basic disk without losing data
Server Partition Manager Resources
Server Partition Manager - Paragon
- How to Make Automatic Backup
- Restore System to Dissimilar Hardware
- Migrate Windows 10 to SSD
- Merge Partitions Without Losing Data
- Recover Data from Hard Drive Won’t Boot
- External Hard Drive Not Accessible
- File System
- HDD VS SSD
- Dynamic Disk and Basic Disk
- Clone Hard Drive to SSD
- Paragon Partition Manager Personal
- Paragon Partition Manager Server
Server Partition Manager - Partition
- Partition Manager 8.5 Enterprise Server Edition
- Partition Manager Enterprise Server
- Partition Manager Enterprise Server Edition
- Partition Manager for Windows Server 2003
- Partition Manager Server
- Partition Manager Server 2003
- Partition Manager Server Edition
- Partition Manager Software
- Partition Manager Windows 2000
- Partition Manager Windows 2000 Server
- Partition Manager Windows 2003
- Partition Manager Windows 2003 Server
- Partition Manager Windows 2008
- Server Partition Manager