Create partition in Windows Server 2003
In many users’ eyes, creating partition is a piece of quite easy work. Indeed, if there is unallocated space on hard disk, it will be quite easy for every user to create partition in Windows Server 2003, and they only need to ask system built-in disk management tool for help since this tool offers a function to create partition. However, if there is no unallocated space on hard disk, creating partition will be difficult and troublesome unless users resort to third-party server partition manager. Well then, which server partition manager can be chosen to create partition in Windows Server 2003? It is unquestionably MiniTool Partition Wizard.
Reasons for choosing MiniTool Partition Wizard
Firstly, this server partition manager provides users with 2 ways to create partition in Windows Server 2003, which will be introduced in the following content. Secondly, it is a read-only server partition manager, so it will not bring any damage to data. Thirdly, users will be given detailed prompts so as to avoid mistaken operations. At last, it will offer a preview effect which can help avoid troubles and inconvenience brought by mistaken operation.
After seeing reasons for choosing this server partition manager, users would want to own it at once. From the downloading website http://www.server-partition-manager.com, users can download it easily and securely.
Create partition in Windows Server 2003
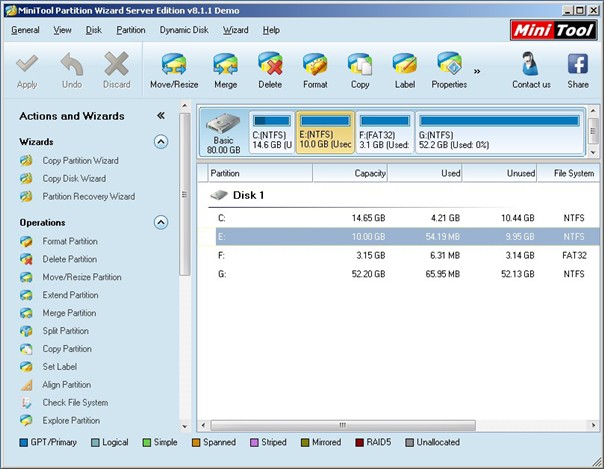
We have said the server partition manager MiniTool Partition Wizard offers 2 ways to create partition in Windows Server 2003. Next, we will introduce the 2 ways in detail. Before creating partition, we need to launch the server partition manager to get its main interface:

In the main interface, all information about disk and partition is shown. To create partition in Windows Server 2003, we have 2 choices. One is to split partition to create a new partition, and the other is to shrink partition to get unallocated space and then create partition.
To split partition, users need to select a partition which has lots of free space left and click the function “Split Partition” from action panel. Then, drag the button between 2 partition handles to resize both new partition and original partition. After getting desired partition size, users need to click “OK” button to go back to the main interface where we can preview a new partition. At this time, please click “Apply” button to apply changes to computer. After application, server partition manager helps create partition in Windows Server 2003 successfully.
To shrink partition, users also need to select the partition which has a lot of unused space, and then choose the function “Move/Resize Partition”. After that, corresponding operating interface emerges, and users should drag one of triangles on edges of partition handle to shorten the partition handle so as to shrink partition. Then, click “OK” button to return to the main interface. Next, select the unallocated space shrunk just now and click the function “Create Partition” in action panel to create partition in Windows Server 2003. At last, click “Apply” button to apply changes to computer. After that, users are successful to create partition in Windows Server 2003 by using the server partition manager, too.
Related Articles:
- Shrink partition in Windows 2003
- Partition manager Windows 2003
- Resize partition in server 2003
- Partition magic for Windows server 2003 free download
- Split a partition in Windows Server 2003
- 2003 server partition manager
- Partition managers for Windows Server 2003
- Partition manager software for Windows server 2003
- Windows Server 2003 Partition Management
- Partition manager for Windows Server 2003
Server Partition Manager Resources
Server Partition Manager - Paragon
- How to Make Automatic Backup
- Restore System to Dissimilar Hardware
- Migrate Windows 10 to SSD
- Merge Partitions Without Losing Data
- Recover Data from Hard Drive Won’t Boot
- External Hard Drive Not Accessible
- File System
- HDD VS SSD
- Dynamic Disk and Basic Disk
- Clone Hard Drive to SSD
- Paragon Partition Manager Personal
- Paragon Partition Manager Server
Server Partition Manager - Partition
- Partition Manager 8.5 Enterprise Server Edition
- Partition Manager Enterprise Server
- Partition Manager Enterprise Server Edition
- Partition Manager for Windows Server 2003
- Partition Manager Server
- Partition Manager Server 2003
- Partition Manager Server Edition
- Partition Manager Software
- Partition Manager Windows 2000
- Partition Manager Windows 2000 Server
- Partition Manager Windows 2003
- Partition Manager Windows 2003 Server
- Partition Manager Windows 2008
- Server Partition Manager